Difference between revisions of "How to Check for a Hardware Key"
(→Step 3 - Plug in the Hardware Key and Run the KeyCheck Program) |
|||
| Line 80: | Line 80: | ||
</td> | </td> | ||
<td> | <td> | ||
| − | + | [[image:keycheck_v7.42.jpg|300px]] | |
| − | + | ||
</td> | </td> | ||
</tr> | </tr> | ||
</table> | </table> | ||
Revision as of 14:12, 12 April 2012
|
This describes how to check for a hardware key.
|
Contents |
Step 1 - Is the Hardware Key Driver Installed?
|
The hardware key driver must be installed for the key to be used on your system. If necessary, download and install the driver. |
Step 2 - Locate or Download the KeyCheck Program
|
Find the keycheck.exe program. Often this program is installed with any Advanced Tubular software that uses a hardware key. If you cannot find it, then please download an installation file and install the keycheck program. |
Step 3 - Plug in the Hardware Key and Run the KeyCheck Program
|
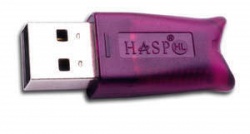
Plug in the key. The key will look like one of the two shown on the right. |
|
Step 4 - Run the KeyCheck Program
|
Run the hardware key program on the system with the key plugged in. It should find the key are report how the key is setup in the log on the screen. |


