Difference between revisions of "Setup VTube for Supravision Network Communication"
(→VTube Setup for Supravision Network Communications) |
|||
| (12 intermediate revisions by one user not shown) | |||
| Line 3: | Line 3: | ||
<table> | <table> | ||
<tr> | <tr> | ||
| − | <td width= | + | <td width=350> |
<br><br> | <br><br> | ||
[[VTube-LASER]] and [[VTube-STEP]] can communicate with bender controls using the Supravision Network protocol.<br><br> | [[VTube-LASER]] and [[VTube-STEP]] can communicate with bender controls using the Supravision Network protocol.<br><br> | ||
| Line 12: | Line 12: | ||
<br> | <br> | ||
* AddisonMckee | * AddisonMckee | ||
| + | * AIM Wirebender | ||
* Benderlink for BLM | * Benderlink for BLM | ||
| − | * COMCO | + | * COMCO DATALINX |
* Crippa | * Crippa | ||
| − | * Eaton Leonard Lightspeed | + | * Eaton Leonard Lightspeed - See [[Eaton Leonard Lightspeed Communications Setup]] |
* Horn Machine Tools with BendPro G1 or G2 | * Horn Machine Tools with BendPro G1 or G2 | ||
* Benderlink for KEINS | * Benderlink for KEINS | ||
| Line 25: | Line 26: | ||
* Unison Limited | * Unison Limited | ||
* Benderlink for Chiyoda (older controls) | * Benderlink for Chiyoda (older controls) | ||
| + | * SOCO (See [[VTube Communication for SOCO]]) | ||
| Line 45: | Line 47: | ||
Go to the Measure 2 tab menu and press on the Benderlink Setup button:<br> | Go to the Measure 2 tab menu and press on the Benderlink Setup button:<br> | ||
| − | [[image:VTube_v2. | + | [[image:VTube_v2.2_systemoptions_globallevellistmanagement_setupbenderlinknetwork.png|800px]]<br><br> |
Follow these instructions:<br><br> | Follow these instructions:<br><br> | ||
| + | VTube-STEP and VTube-LASER uses a Benderlink grid to set up the communications protocol for each bender. The grid is in Setup Options, Measure 2, Setup Benderlink Options menu.<br><br> | ||
| + | |||
| + | In the Benderlink options menu, choose the bender to edit by selecting the cells in the bender row you want to set up.<br><br> | ||
<table width=900> | <table width=900> | ||
<tr valign=top> | <tr valign=top> | ||
<td width=400> | <td width=400> | ||
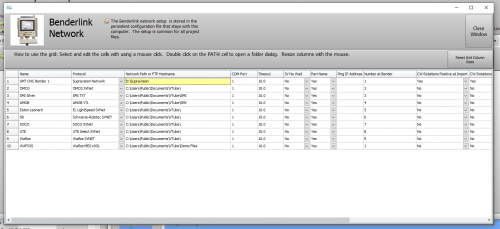
| + | * Set the bender name (this is for showing the bender name in the user interface only). | ||
| + | * Set the protocol by choosing Supravision Network. Note that many benders have their own dedicated Supravision Network protocol. If there is one available for your bender, then you can select that one rather than the generic Supravision Network protocol. | ||
| + | * Set the NetPath where files will be shared. | ||
| + | * Skip the ComPort setting because it has no application to this protocol. | ||
| + | * Set the timeout to from 5 to 10 seconds for most controls. This will give the control a few seconds to respond to requests. | ||
| + | * Set SV No Wait to "No" - since this option is only used for USB thumbdrive communications. | ||
| + | * Set the Part Name Match to Yes or No. If the option is set to Yes, then a mismatched part name in the data will cause VTube-LASER to warn of a part name mismatch while receiving data. | ||
| + | * If the network location server has a fixed IP address, then the location can be pinged to prove that the network path is currently available before VTube attempts to save files in the network path. | ||
| + | * Set the number at the bender. This allows any bender in any row to have any bender number. Remember: If all Supravision Network-based benders share the same network path, then each bender should be assigned a unique bender number. | ||
| + | </td> | ||
| + | <td> | ||
| + | [[image:vtube_benderlinkgridleft.png|500px]]<br><br> | ||
| + | </td> | ||
| + | </tr> | ||
| − | + | <tr valign=top> | |
| − | + | <td width=400> | |
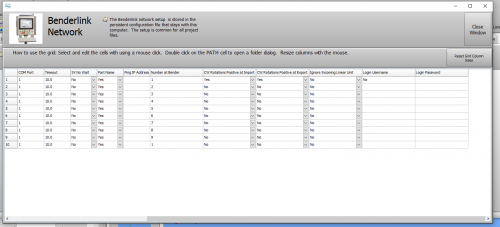
| − | + | * If the bender uses CW rotations for positive rotations, then switch this feature ON in both the Import and Export columns for CW rotations. Stand at the front of the bender and jog the rotation positive. If the collet turns Clockwise, then this is the opposite direction used by VTube-LASER. Invert the rotation values by choosing YES in this cell. | |
| − | + | * Set the "Ignore Incoming Linear Unit" to false. | |
| − | + | * Skip the "Login" columns. These are only for FTP protocols. | |
| − | + | ||
| − | + | ||
| − | + | ||
| − | + | ||
| − | + | ||
| − | + | ||
| − | + | ||
| − | * If the bender uses CW rotations for positive rotations, then switch this feature ON. Stand at the front of the bender and jog the rotation positive. If the collet turns Clockwise, then this is the opposite direction used by VTube-LASER. Invert the rotation values by choosing YES in this cell. | + | |
* Exit this menu.<br><br> | * Exit this menu.<br><br> | ||
* Exit the System Options menu.<br><br> | * Exit the System Options menu.<br><br> | ||
| − | * Now VTube is setup for communications with this bender. | + | * Now VTube is setup for communications with this bender. |
</td> | </td> | ||
<td> | <td> | ||
| − | [[image: | + | [[image:vtube_benderlinkgridright.png|500px]]<br><br> |
</td> | </td> | ||
</tr> | </tr> | ||
| + | |||
</table> | </table> | ||
| Line 126: | Line 138: | ||
*[[Benderlink]] | *[[Benderlink]] | ||
*[[Benderlink for SolidWorks]] | *[[Benderlink for SolidWorks]] | ||
| + | * See [[Eaton Leonard Lightspeed Communications Setup]] | ||
Latest revision as of 19:46, 18 April 2022
|
|
VTube Setup for Supravision Network Communications
In either VTube-STEP or VTube-LASER, press the System Options button:
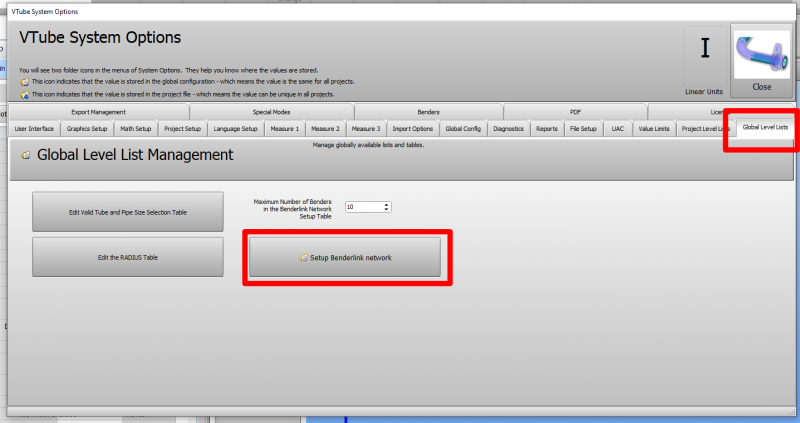
Go to the Measure 2 tab menu and press on the Benderlink Setup button:
Follow these instructions:
VTube-STEP and VTube-LASER uses a Benderlink grid to set up the communications protocol for each bender. The grid is in Setup Options, Measure 2, Setup Benderlink Options menu.
In the Benderlink options menu, choose the bender to edit by selecting the cells in the bender row you want to set up.
|
|
|
How to Use the VTube-LASER Supravision Network Communications
|
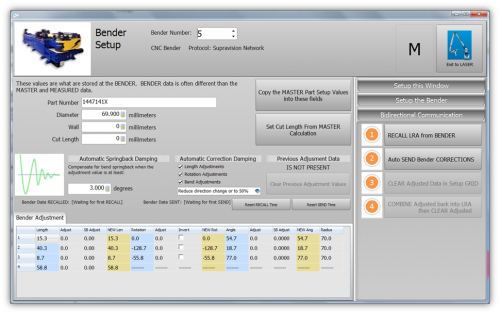
To communicate with a bender when using VTube-LASER, switch to the Bender Setup menu (see the navigation pane on the right), then follow these steps.
|
How to SEND a New Part the Bender using VTube-STEP
|
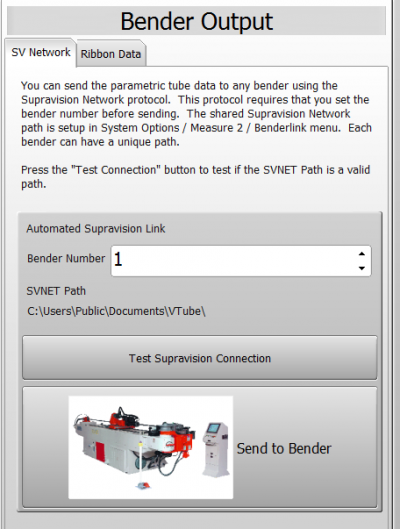
Use the VTube-STEP Bender Output menu to send new part data to a bender using Supravision Network protocol.
|
Other Pages
- See more information on VTube-LASER Bender Corrections
- VTube-LASER
- VTube-STEP
- Benderlink
- Benderlink for SolidWorks
- See Eaton Leonard Lightspeed Communications Setup
