Difference between revisions of "Set Key License"
| (19 intermediate revisions by one user not shown) | |||
| Line 1: | Line 1: | ||
| − | + | <table> | |
| + | <tr> | ||
| + | <td width="300"> | ||
| + | Permanent hardware keys contain licenses in memory. These licenses control which programs your computers can run with the key.(See [[Software License Program ID List]] for a list of licenses.)<br><br> | ||
| − | + | If the permanent hardware key needs new or additional licenses, then we will send you a link to a program that will allow you to update the key. | |
| + | </td> | ||
| + | <td> | ||
| + | [[image:hasp_hl_pro.jpg|250px]] | ||
| + | </td> | ||
| + | </tr> | ||
| + | </table> | ||
| + | |||
| + | '''These are the steps to take to set the license in a hardware key:''' | ||
<table cellpadding="15" width = 650> | <table cellpadding="15" width = 650> | ||
| Line 10: | Line 21: | ||
<font size=4><b>STEP 1</b></font> | <font size=4><b>STEP 1</b></font> | ||
----<br> | ----<br> | ||
| − | + | We will ask you to find the serial number of the hardware key using Keycheck.exe.<br><br> | |
| + | |||
| + | Keycheck.exe is usually found in the \key folder under the program's folder.<br><br> | ||
| + | |||
| + | You can also download the latest keycheck.exe from the Utility page on our web site: http://www.advancedtubular.com/utilitysoftware.htm | ||
</td> | </td> | ||
<td bgcolor="#e3e4f5"> | <td bgcolor="#e3e4f5"> | ||
| − | + | The log can be sent to us using your e-mail system using the Send Log button. | |
| − | + | <br><br> | |
| − | + | Or you can right-click on either log, then select Copy All to Clipboard. | |
<br><br> | <br><br> | ||
| − | + | [[image:keycheck_serialnumber.jpg|350px]] | |
| − | + | ||
| − | + | ||
| − | + | ||
</td> | </td> | ||
</tr> | </tr> | ||
<tr valign="top"> | <tr valign="top"> | ||
| − | <td bgcolor="#abbad1"> | + | <td bgcolor="#abbad1" width=150> |
<font size=4><b>STEP 2</b></font> | <font size=4><b>STEP 2</b></font> | ||
----<br> | ----<br> | ||
| − | Run the | + | We will create and send you an ATTSetKey.exe program that is unique to the hardware key on your system.<br><br> |
| + | |||
| + | Run the program. | ||
</td> | </td> | ||
<td bgcolor="#e3e4f5"> | <td bgcolor="#e3e4f5"> | ||
| − | + | The program will display your company name and the license information. | |
| − | + | <br><br> | |
| − | + | The program will also display the internal serial number of the hardware key. This is a unique number on the key that we sent you. | |
| − | + | <br><br> | |
| − | + | [[image:setkey_step1.jpg|250px]] | |
| − | [[image: | + | |
</td> | </td> | ||
</tr> | </tr> | ||
<tr valign="top"> | <tr valign="top"> | ||
| − | <td bgcolor="#abbad1" > | + | <td bgcolor="#abbad1"> |
<font size=4><b>STEP 3</b></font> | <font size=4><b>STEP 3</b></font> | ||
----<br> | ----<br> | ||
| − | + | Press the "Next" button. | |
</td> | </td> | ||
<td bgcolor="#e3e4f5"> | <td bgcolor="#e3e4f5"> | ||
| − | + | Insert the permanent hardware key in the computer. If you were using a time-limited key, be sure to remove it before continuing. | |
| − | If you | + | |
<br><br> | <br><br> | ||
| + | [[image:setkey_step2.jpg|250px]] | ||
</td> | </td> | ||
</tr> | </tr> | ||
| − | |||
<tr valign="top"> | <tr valign="top"> | ||
| Line 58: | Line 70: | ||
<font size=4><b>STEP 4</b></font> | <font size=4><b>STEP 4</b></font> | ||
----<br> | ----<br> | ||
| − | + | Press the "Next" button. | |
</td> | </td> | ||
<td bgcolor="#e3e4f5"> | <td bgcolor="#e3e4f5"> | ||
| − | [[image: | + | The program will check for a hardware key and report the results in the log. |
| − | + | <br><br> | |
| + | If you see a "Match OK" in the log, then you can continue. | ||
| + | <br><br> | ||
| + | [[image:setkey_step3.jpg|250px]] | ||
</td> | </td> | ||
</tr> | </tr> | ||
| + | |||
<tr valign="top"> | <tr valign="top"> | ||
| Line 70: | Line 86: | ||
<font size=4><b>STEP 5</b></font> | <font size=4><b>STEP 5</b></font> | ||
----<br> | ----<br> | ||
| − | Press the | + | Press the "Next" button |
</td> | </td> | ||
<td bgcolor="#e3e4f5"> | <td bgcolor="#e3e4f5"> | ||
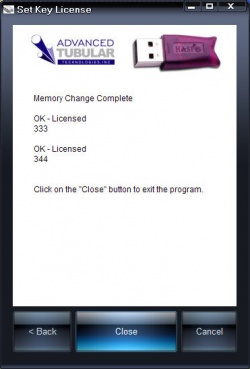
| − | + | If the update occurred successfully, then the "Next" button will change to a "Close" button. Press "Close" to exit the program. | |
| − | + | ||
<br><br> | <br><br> | ||
| − | [[image: | + | [[image:setkey_step4.jpg|250px]] |
| − | + | ||
| − | + | ||
| − | + | ||
| − | + | ||
| − | + | ||
| − | + | ||
| − | + | ||
| − | + | ||
</td> | </td> | ||
</tr> | </tr> | ||
| Line 92: | Line 99: | ||
<font size=4><b>STEP 6</b></font> | <font size=4><b>STEP 6</b></font> | ||
----<br> | ----<br> | ||
| − | + | Run the KeyCheck or the licensed program(s) | |
</td> | </td> | ||
<td bgcolor="#e3e4f5"> | <td bgcolor="#e3e4f5"> | ||
| − | [[ | + | You can run the [[KeyCheck]] utility to be sure that the license was uploaded to the key. Or you can just run the licensed applications.<br><br> |
| − | + | [[image:setkey_step5.jpg|275px]] | |
| − | + | ||
| − | + | ||
| − | <br><br> | + | |
| − | + | ||
</td> | </td> | ||
</tr> | </tr> | ||
| + | </table> | ||
| + | ==Other Pages== | ||
| − | + | *[[Hardware Key]] | |
| − | + | *[[ATTSetKey]] | |
| − | + | *[[Extending Time-Limited Keys]] | |
| − | + | ||
| − | + | ||
| − | + | ||
| − | + | ||
| − | + | ||
| − | + | ||
| − | + | ||
| − | + | ||
| − | + | ||
| − | + | ||
| − | + | ||
| − | + | ||
| − | + | ||
| − | + | ||
| − | + | ||
| − | + | ||
| − | + | ||
| − | + | ||
Latest revision as of 14:32, 26 May 2011
|
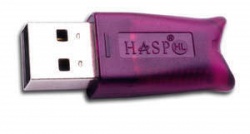
Permanent hardware keys contain licenses in memory. These licenses control which programs your computers can run with the key.(See Software License Program ID List for a list of licenses.) If the permanent hardware key needs new or additional licenses, then we will send you a link to a program that will allow you to update the key. |
These are the steps to take to set the license in a hardware key:
|
STEP 1 We will ask you to find the serial number of the hardware key using Keycheck.exe. Keycheck.exe is usually found in the \key folder under the program's folder. You can also download the latest keycheck.exe from the Utility page on our web site: http://www.advancedtubular.com/utilitysoftware.htm |
The log can be sent to us using your e-mail system using the Send Log button.
|
|
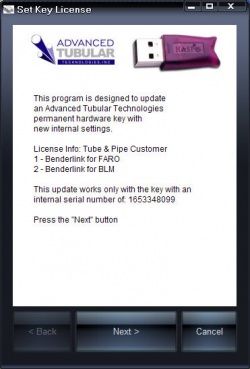
STEP 2 We will create and send you an ATTSetKey.exe program that is unique to the hardware key on your system. Run the program. |
The program will display your company name and the license information.
|
|
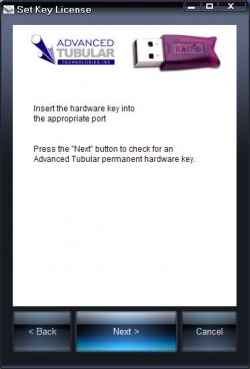
STEP 3 Press the "Next" button. |
Insert the permanent hardware key in the computer. If you were using a time-limited key, be sure to remove it before continuing.
|
|
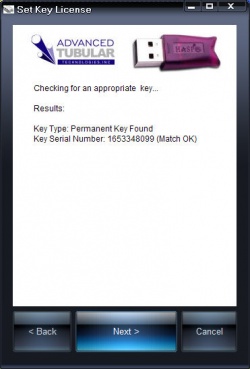
STEP 4 Press the "Next" button. |
The program will check for a hardware key and report the results in the log.
|
|
STEP 5 Press the "Next" button |
If the update occurred successfully, then the "Next" button will change to a "Close" button. Press "Close" to exit the program.
|
|
STEP 6 Run the KeyCheck or the licensed program(s) |
You can run the KeyCheck utility to be sure that the license was uploaded to the key. Or you can just run the licensed applications. |
