Difference between revisions of "VTube-LASER End Point Deviations"
From ATTWiki
(→How to Understand the Tangent Data) |
(→BEFORE-TRIM Deviations) |
||
| (6 intermediate revisions by one user not shown) | |||
| Line 14: | Line 14: | ||
| − | == Three | + | == Three Types of End Point Deviations == |
<table cellpadding=10> | <table cellpadding=10> | ||
<tr valign=top> | <tr valign=top> | ||
| − | <td width= | + | <td width=300> |
| − | There are three | + | There are three types of end point deviation values calculated during an alignment of the MEASURED to the MASTER tube.<br><br> |
</td> | </td> | ||
<td width=700> | <td width=700> | ||
| Line 31: | Line 31: | ||
<table cellpadding=10> | <table cellpadding=10> | ||
<tr valign=top> | <tr valign=top> | ||
| − | <td width= | + | <td width=300> |
The end length deviations are found at the top of the Inspection menu. | The end length deviations are found at the top of the Inspection menu. | ||
<br><br> | <br><br> | ||
| Line 45: | Line 45: | ||
<table cellpadding=10> | <table cellpadding=10> | ||
<tr valign=top> | <tr valign=top> | ||
| − | <td width= | + | <td width=300> |
These are found in the first T1 value and the last T2 value in the Tangents grid. | These are found in the first T1 value and the last T2 value in the Tangents grid. | ||
<br><br> | <br><br> | ||
| Line 57: | Line 57: | ||
| − | + | ====3D Length Deviations ==== | |
| − | + | ||
| − | == | + | |
| − | + | ||
| − | === | + | |
<table cellpadding=10> | <table cellpadding=10> | ||
<tr valign=top> | <tr valign=top> | ||
| − | |||
| − | |||
| − | |||
| − | |||
| − | |||
| − | |||
<td width=300> | <td width=300> | ||
| − | + | These are found in the Intersection grid values. | |
| + | <br><br> | ||
| + | The 3D deviations represent for the first and the last points represent the total radial deviation between the MASTER and the MEASURED end points in this alignment orientation. | ||
</td> | </td> | ||
| − | + | <td width=700> | |
| − | + | [[image:vtl before-trim deviations.png|700px]] | |
| − | + | ||
| − | + | ||
| − | + | ||
| − | + | ||
| − | <td width= | + | |
| − | + | ||
| − | + | ||
| − | + | ||
| − | + | ||
| − | + | ||
| − | + | ||
| − | + | ||
| − | + | ||
| − | + | ||
| − | + | ||
| − | [[image: | + | |
</td> | </td> | ||
</tr> | </tr> | ||
| Line 96: | Line 72: | ||
| − | + | <br><br> | |
| − | + | ||
| − | + | ||
| − | + | ||
| − | + | ||
| − | + | ||
| − | + | ||
| − | + | ||
| − | + | ||
| − | + | ||
| − | + | ||
| − | + | ||
| − | + | ||
| − | + | ||
| − | + | ||
| − | + | ||
| − | + | ||
| − | + | ||
| − | + | ||
| − | + | ||
| − | + | ||
| − | + | ||
| − | + | ||
| − | + | ||
| − | + | ||
| − | + | ||
| − | + | ||
| − | + | ||
| − | + | ||
| − | + | ||
| − | + | ||
| − | + | ||
| − | + | ||
| − | + | ||
| − | + | ||
| − | + | ||
| − | + | ||
| − | + | ||
| − | + | ||
| − | + | ||
| − | + | ||
| − | + | ||
| − | + | ||
| − | + | ||
| − | + | ||
| − | + | ||
| − | + | ||
| − | + | ||
| − | + | ||
| − | + | ||
| − | + | ||
| − | + | ||
| − | + | ||
| − | + | ||
| − | + | ||
| − | + | ||
| − | + | ||
| − | + | ||
| − | + | ||
| − | + | ||
| − | + | ||
| − | + | ||
| − | + | ||
| − | + | ||
| − | + | ||
| − | + | ||
| − | + | ||
| − | + | ||
| − | + | ||
| − | + | ||
| − | + | ||
| − | + | ||
| − | + | ||
| − | + | ||
| − | + | ||
| − | + | ||
| − | + | ||
| − | + | ||
| − | + | ||
| − | + | ||
| − | + | ||
| − | + | ||
| − | + | ||
| − | + | ||
| − | + | ||
| − | + | ||
| − | + | ||
| − | + | ||
| − | + | ||
| − | + | ||
| − | + | ||
| − | + | ||
| − | + | ||
| − | + | ||
| − | + | ||
| − | + | ||
| − | + | ||
| − | + | ||
| − | + | ||
| − | + | ||
| − | + | ||
| − | + | ||
| − | + | ||
| − | + | ||
| − | + | ||
| − | + | ||
| − | + | ||
| − | + | ||
| − | + | ||
| − | + | ||
| − | + | ||
| − | + | ||
| − | + | ||
| − | + | ||
| − | + | ||
| − | + | ||
| − | + | ||
| − | + | ||
| − | + | ||
| − | + | ||
| − | + | ||
| − | + | ||
| − | + | ||
| − | + | ||
| − | + | ||
| − | + | ||
| − | + | ||
| − | + | ||
| − | + | ||
| − | + | ||
| − | + | ||
| − | + | ||
| − | + | ||
| − | + | ||
| − | + | ||
| − | + | ||
| − | + | ||
| − | + | ||
| − | + | ||
| − | + | ||
| − | + | ||
| − | + | ||
| − | + | ||
| − | + | ||
| − | + | ||
| − | + | ||
| − | + | ||
| − | + | ||
| − | + | ||
| − | + | ||
| − | + | ||
| − | + | ||
| − | + | ||
| − | + | ||
| − | + | ||
| − | + | ||
=Other Pages= | =Other Pages= | ||
* See also [[VTube Intersection Point Tolerances]] | * See also [[VTube Intersection Point Tolerances]] | ||
| + | * [[What are Centerline Tangent Points and Why Are They Important in VTube-LASER?]] | ||
| + | * About [[VTube Intersection Point Tolerances]] | ||
| + | * About [[VTube End Length Offsets]] | ||
| + | * [[The Limitations of Qualifying Tube Shapes using Bender Data]] | ||
* Back to [[VTube-LASER]] | * Back to [[VTube-LASER]] | ||
Latest revision as of 02:09, 31 July 2020
|
|
Contents |
Three Types of End Point Deviations
|
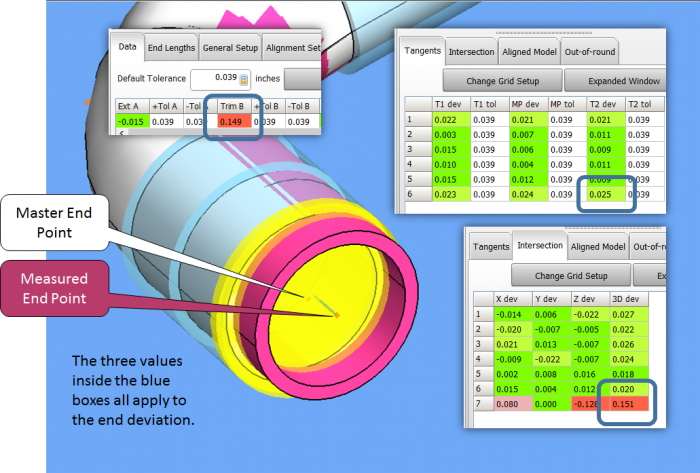
There are three types of end point deviation values calculated during an alignment of the MEASURED to the MASTER tube. |
END LENGTH Deviations
|
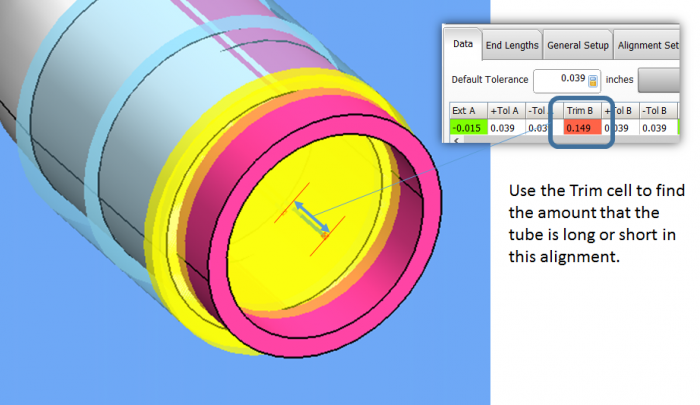
The end length deviations are found at the top of the Inspection menu.
|
AFTER-TRIM Deviations
|
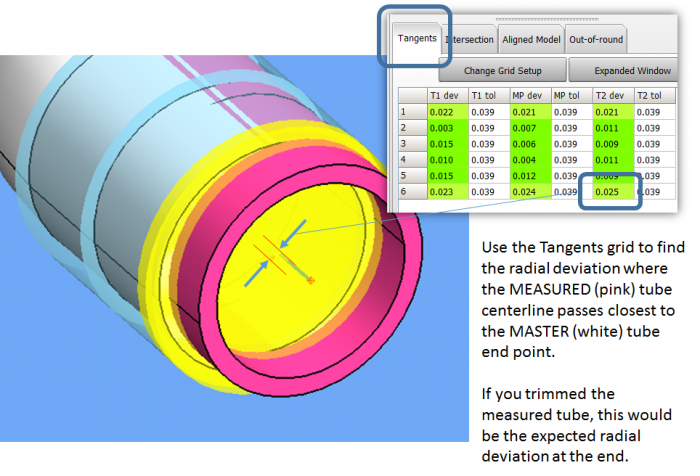
These are found in the first T1 value and the last T2 value in the Tangents grid.
|
3D Length Deviations
|
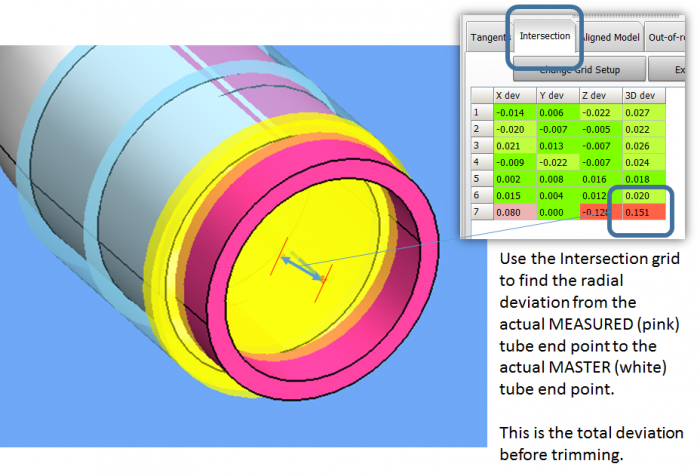
These are found in the Intersection grid values.
|


