Difference between revisions of "AddisonMckee"
(→How to Enable Communications on an AddisonMckee Bender) |
(→How to Enable Supravision Network Communications on an AddisonMckee Bender) |
||
| (16 intermediate revisions by one user not shown) | |||
| Line 29: | Line 29: | ||
<br><br> | <br><br> | ||
| − | ==How to Enable Communications on an AddisonMckee Bender== | + | ==How to Enable Supravision Network Communications on an AddisonMckee Bender== |
| + | |||
| + | VTube-LASER can communicate with AddisonMckee controls using Supravision Network protocol. | ||
To enable Supravision network communications, it is necessary to map a drive S: to a network path in the AddisonMckee control. The network path is where VTube-LASER will be putting Supravision files for commands. In order to map drive S, it is necessary to be running in Technician mode with a special hardware key (dongle). We've discovered that many AddisonMckee benders run in Technician mode all the time. The way to find if you are running in this mode is to try to map drive S like this: | To enable Supravision network communications, it is necessary to map a drive S: to a network path in the AddisonMckee control. The network path is where VTube-LASER will be putting Supravision files for commands. In order to map drive S, it is necessary to be running in Technician mode with a special hardware key (dongle). We've discovered that many AddisonMckee benders run in Technician mode all the time. The way to find if you are running in this mode is to try to map drive S like this: | ||
| Line 35: | Line 37: | ||
Map drive S: | Map drive S: | ||
| − | *Press F12 | + | *Press F12 on the control keyboard. |
| − | *Choose Network Options | + | *A dialog should pop up. Choose "Network Options". |
| − | *Choose "Add Addata Network Drive" | + | *Choose "Add Addata Network Drive". |
| + | *Set this bender up as bender number 1 through 99. (Be sure it is set to a unique number compared to the other benders). In this dialog, YOU MUST PRESS THE KEYBOARD ENTER RATHER THAN "YES" on the screen. If you press YES on the screen, then bender number will not be changed. This is a known bug (or security feature?) in AddisonMckee controls that you must be careful of. | ||
| + | *We've also found that you must also select all the bender/Supravision numbers for the AddisonMckee control to take a new number using the KEYBOARD and not the SCREEN control. | ||
| + | |||
| + | *After setup is complete, the way to determine the bender number is to open the dialog under one of the measuring center buttons. That dialog will show a bender number in the upper left corner of the window. | ||
| + | |||
| + | <br><br> | ||
| + | |||
| + | ==Communications rules for SENDING NEW PARTS to the bender== | ||
| + | |||
| + | It is important to create a new part in an AddisonMckee file in the operator station first before attempting to communicate with a given part number from the measuring center. | ||
| + | |||
| + | #The part name must be the same. | ||
| + | #The number of bends must be the same. | ||
| + | #The tools must be already setup before communication occurs - or the tools will reset to default values. | ||
| + | #The LRA values do not matter (can be zeros) if you are sending new MASTER data from VTube (if you are NOT sending a correction). | ||
| − | |||
| − | + | ==Communications rules for Correcting EXISTING PARTS== | |
| − | |||
| − | + | #Load the part to the AM control. | |
| + | #Recall the data to VTube (button 1 in the Bender Setup screen) | ||
| + | #Send data as a correction (button 2 in the Bender Setup screen) | ||
| + | #On some AM controls, it is necessary to change away from YBC screen if it is the current screen during communications, then back to the LRA screen in order for the values to refresh on the screen. | ||
| + | #Another way to refresh the values is to reopen the file. The way the AM handles corrections is to take in the data, then SAVE THE FILE. So reopening the file should always refresh the data. | ||
| + | <br><br> | ||
| + | '''Note that is critical to RECALL from the AM bender control before sending corrections. The reason is that VTube-LASER will take in all the TEACH MODE data from the AddisonMckee. This teach mode data must be returned when sending the corrections back to the AddisonMckee control, or the teach mode setup at the AddisonMckee will be lost.''' | ||
| + | ==Benderlink for AddisonMckee== | ||
<table> | <table> | ||
Latest revision as of 15:21, 14 May 2020
|
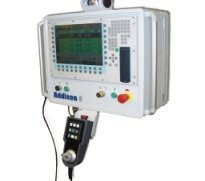
Addison McKee produces tube bending machines. They are headquartered in Brantford, Ontario, Canada, and have an office in Lebanon, Ohio. As of March 17, 2009, AddisonMckee and Eagle have merged. |
|
|
The latest control from Addison is the Mark V ("Mark Five") control. Mark IV and Mark V controls are Windows-based. |
- See Benderlink for Addison for software that links this bender to Eaton Leonard Vector Tube Data Centers.
Contents |
How to Enable Supravision Network Communications on an AddisonMckee Bender
VTube-LASER can communicate with AddisonMckee controls using Supravision Network protocol.
To enable Supravision network communications, it is necessary to map a drive S: to a network path in the AddisonMckee control. The network path is where VTube-LASER will be putting Supravision files for commands. In order to map drive S, it is necessary to be running in Technician mode with a special hardware key (dongle). We've discovered that many AddisonMckee benders run in Technician mode all the time. The way to find if you are running in this mode is to try to map drive S like this:
Map drive S:
- Press F12 on the control keyboard.
- A dialog should pop up. Choose "Network Options".
- Choose "Add Addata Network Drive".
- Set this bender up as bender number 1 through 99. (Be sure it is set to a unique number compared to the other benders). In this dialog, YOU MUST PRESS THE KEYBOARD ENTER RATHER THAN "YES" on the screen. If you press YES on the screen, then bender number will not be changed. This is a known bug (or security feature?) in AddisonMckee controls that you must be careful of.
- We've also found that you must also select all the bender/Supravision numbers for the AddisonMckee control to take a new number using the KEYBOARD and not the SCREEN control.
- After setup is complete, the way to determine the bender number is to open the dialog under one of the measuring center buttons. That dialog will show a bender number in the upper left corner of the window.
Communications rules for SENDING NEW PARTS to the bender
It is important to create a new part in an AddisonMckee file in the operator station first before attempting to communicate with a given part number from the measuring center.
- The part name must be the same.
- The number of bends must be the same.
- The tools must be already setup before communication occurs - or the tools will reset to default values.
- The LRA values do not matter (can be zeros) if you are sending new MASTER data from VTube (if you are NOT sending a correction).
Communications rules for Correcting EXISTING PARTS
- Load the part to the AM control.
- Recall the data to VTube (button 1 in the Bender Setup screen)
- Send data as a correction (button 2 in the Bender Setup screen)
- On some AM controls, it is necessary to change away from YBC screen if it is the current screen during communications, then back to the LRA screen in order for the values to refresh on the screen.
- Another way to refresh the values is to reopen the file. The way the AM handles corrections is to take in the data, then SAVE THE FILE. So reopening the file should always refresh the data.
Note that is critical to RECALL from the AM bender control before sending corrections. The reason is that VTube-LASER will take in all the TEACH MODE data from the AddisonMckee. This teach mode data must be returned when sending the corrections back to the AddisonMckee control, or the teach mode setup at the AddisonMckee will be lost.
Benderlink for AddisonMckee
|
Eaton Leonard Vector Tube Data Center and AddisonMckee Benders |
Download an applications datasheet for the Eaton Leonard Vector Tube Data Center and AddisonMckee Benders. |


