Difference between revisions of "Controlling Deadband"
From ATTWiki
(→Other Pages) |
(→STEP 1: Create a new CIO) |
||
| Line 7: | Line 7: | ||
<td width=500> | <td width=500> | ||
Create a new CIO for the servo module in the CIO Editor like this:<br> | Create a new CIO for the servo module in the CIO Editor like this:<br> | ||
| − | [[image:cncbender_cio_deadband.png]]<br><br> | + | [[image:cncbender_cio_deadband.png|600px]]<br><br> |
</td> | </td> | ||
<td width=300> | <td width=300> | ||
| Line 14: | Line 14: | ||
</tr> | </tr> | ||
</table> | </table> | ||
| − | |||
==STEP 2: Create a new COMDEF with the new CIO == | ==STEP 2: Create a new COMDEF with the new CIO == | ||
Revision as of 14:54, 9 August 2013
Deadband can be controlled by taking these steps.
Contents |
STEP 1: Create a new CIO
|
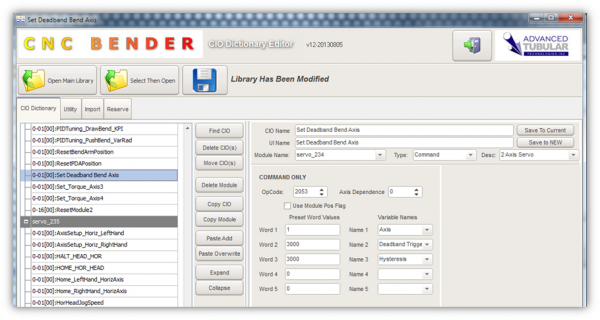
Create a new CIO for the servo module in the CIO Editor like this: |
STEP 2: Create a new COMDEF with the new CIO
STEP 3: Insert the COMDEF Name in the PreEnable.cncprocesslist File
|
The PreEnable file will run commands before enabling any axis. The file is found in c:\cnc\config\cncprocesslist |
Other Pages
- Back to CNC Bender Tutorials
- Back to CNC Bender

