Difference between revisions of "Wiring: Safety Relay to Servo Module Fault Input"
(→How to Determine Which Wiring Setup a Bender Uses) |
|||
| Line 3: | Line 3: | ||
==How to Determine Which Wiring Setup a Bender Uses== | ==How to Determine Which Wiring Setup a Bender Uses== | ||
| + | |||
| + | <table cellpadding="15"> | ||
| + | <tr><td width=25></td> | ||
| + | <td width=300 bgcolor="#f0f0f0"> | ||
| + | <font size=5>[[image:Gear_warning.jpg]] <b>WARNING!</b><br><br></font> | ||
| + | <font size=3>Only experienced electrical technicians should perform what we describe next. | ||
| + | <br><br> | ||
| + | There can be high voltages and currents of electricity flowing through the electrical panel. | ||
| + | </font></td></tr></table> | ||
<table> | <table> | ||
Revision as of 20:52, 5 February 2009
About the Wiring Standard
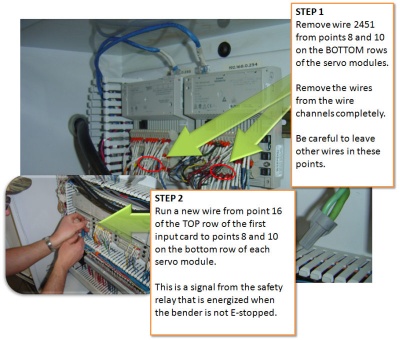
For increased safety, newer SMT benders are wired so that the servo modules fault inputs receive signal from the safety relay. The fault input points on the I2T servo modules are at points 8 and 10 on the bottom row of the terminal strips on these modules.
How to Determine Which Wiring Setup a Bender Uses
|
|
|
You can determine if the wiring on your bender is older by examining these points. If the points have wires labeled "2451", then your bender uses the older style of wire routing. To re-route the wiring to be compatible with newer benders, remove the 2451 wires from these points, then replace them with wires from the top row terminal strip point 16 of either module 192.168.0.201 or module 192.68.0.205. |
