Difference between revisions of "VTube-LASER to Eaton Leonard Premier Communications Tutorial"
(→Sending a NEW Part) |
(→Sending a NEW Part) |
||
| Line 74: | Line 74: | ||
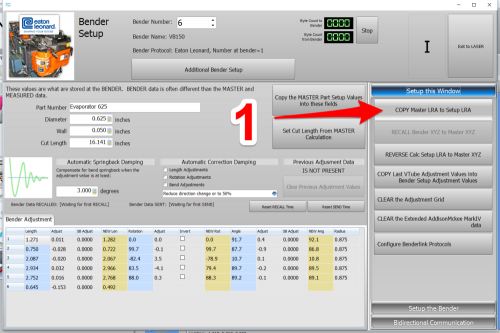
# Bring new part data into the Bender Setup window by using the Setup this Window button on the right.<br><br> | # Bring new part data into the Bender Setup window by using the Setup this Window button on the right.<br><br> | ||
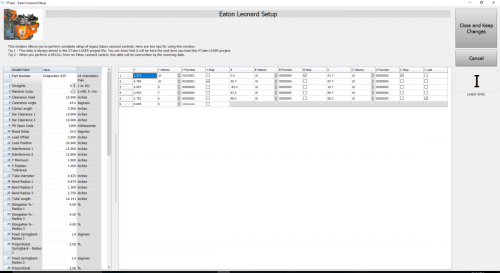
# Press the new "'''Additional Bender Data'''" button at the top of the Bender Setup screen to load the Eaton Leonard Setup window.<br><br> | # Press the new "'''Additional Bender Data'''" button at the top of the Bender Setup screen to load the Eaton Leonard Setup window.<br><br> | ||
| − | # Setup the Eaton Leonard | + | # Setup the Eaton Leonard Data by pressing the "Additional Bender Data" button.<br><br> |
| + | # Press "Setup the Bender" on the right.<br><br> | ||
| + | # Press | ||
'''Remember that VTube-LASER Data OVERWRITES ALL DATA at the EL control When SENDING to the PREMIER'''<br><br> | '''Remember that VTube-LASER Data OVERWRITES ALL DATA at the EL control When SENDING to the PREMIER'''<br><br> | ||
Revision as of 05:08, 1 December 2016
|
VTube-LASER uses the legacy Eaton Leonard Current Loop protocol to communicate with Premier controls. The protocol requires that an RS-232 signal be converted to Current Loop, then sent to the bender. |
Contents |
How to Use Communication Between the Premier and VTube-LASER
Communications between VTube-LASER and the Premier is very easy to do because it's robust and also very intuitive.
The Initial Premier VECTOR 1 Menu
|
All communications from the PREMIER control occurs in the VECTOR 1 screen shown here. |
Premier VECTOR 1 Menu With Communications Active
|
To put the Premier in communications mode, make the REQUEST TRANSFER box active (green) like is shown here. The WAITING field will be highlighted. CHECK 1 - CORRECT MODE IS ACTIVE |
SENDING from VTube-LASER to the PREMIER
|
Before sending data to a legacy Eaton Leonard control, you can completely setup the control inside VTube-LASER if you have VTube-LASER version 2.7 or greater. VTube-LASER will allow for the complete setup of all bender and setup data that can be stored in a Premier, EL2000, or Velog control in the Eaton Leonard Setup window. |
|
Sending a NEW Part
Remember that VTube-LASER Data OVERWRITES ALL DATA at the EL control When SENDING to the PREMIER To send a new part, use the BENDER SETUP menu on the right side of the Bend |
Other Pages
- See VTube-LASER to Premier, EL2000, Velog Data Transfer
- Back to the Benderlink Ethernet Module Page
- Back to VTube-LASER
- Back to Eaton Leonard


