How to Install a MOXA Device Driver in Windows

From ATTWiki
Revision as of 19:49, 5 November 2016 by Mcone (Talk | contribs)

Jump to: navigation, search

Use this video to learn how to install a MOXA device driver for connection to a bender for linking to a virtual COM port through a network.

This video assumes that the MOXA device is completely programmed and attached to the bender network through a LAN cable or Wireless connection.


Moxa driver installation video.png

Programming the MOXA with FACTORY Settings

Follow these steps to program a MOXA NPort with factory settings (the videos above assume that this has already been performed).

  1. Download the NPort DataSheet.
  2. Install the Nport program for setup
  3. Plug a standard patch cable from the setup computer to the MOXA device.

  4. Set the IP address of the computer port to 192.168.126.1 (Some MOXA devices use 192.168.127.254 for the initial network setup. If .126 does not work, then you can try 192.168.127.1 and ping for 192.168.127.254 in the cmd box.)

  5. Load an internet browser and type "192.168.126.254" (per the note above, some use 192.168.127.254) in the address box and press Enter.

  6. The MOXA setup page should display. Click on Network Settings.

  7. Change the IP address to the new network scheme. (Often with this format: 192.168.1.nnn, were "nnn" is any number from 2 to 254)

  8. Click on Submit.

  9. Click on Save/Restart.

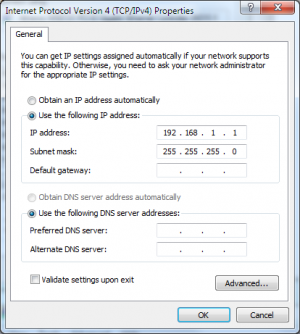
  10. Set the IP address of the computer port to 192.168.1.1

  11. Follow the steps in the video above to add a COM port

  12. Use the Advanced Tubular Loopback Tester Software tester software with a loopback plug to determine if the MOXA will communicate. (See how to create a loopback plug here: Loopback Adapter Wiring Specification

  13. Power the MOXA down then back up to be sure it retains the IP addressed programmed.

  14. Run the Loopback test again.

Loopback passx3.jpg

Ip properties 192 168 127 1.png

Moxa web setup 192 168 127 254.png

Ip properties 192 168 1 1.png

Other